
Azure Security Center and Azure Defender are now called Microsoft Defender for Cloud. We’ve also renamed Azure Defender plans to Microsoft Defender plans. For example, Azure Defender for Storage is now Microsoft Defender for Storage. Learn more about the recent renaming of Microsoft security services.
Defender for Cloud is a tool for security posture management and threat protection. It strengthens the security posture of your cloud resources, and with its integrated Microsoft Defender plans, Defender for Cloud protects workloads running in Azure, hybrid, and other cloud platforms.
Defender for Cloud provides the tools needed to harden your resources, track your security posture, protect against cyber attacks, and streamline security management. Because it’s natively integrated, deployment of Defender for Cloud is easy, providing you with simple auto provisioning to secure your resources by default.
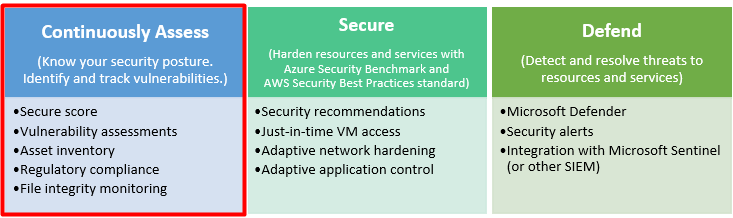
Defender for Cloud fills three vital needs as you manage the security of your resources and workloads in the cloud and on-premises:

| Security requirement | Defender for Cloud solution |
|---|---|
| Continuous assessment – Understand your current security posture. | Secure score – A single score so that you can tell, at a glance, your current security situation: the higher the score, the lower the identified risk level. |
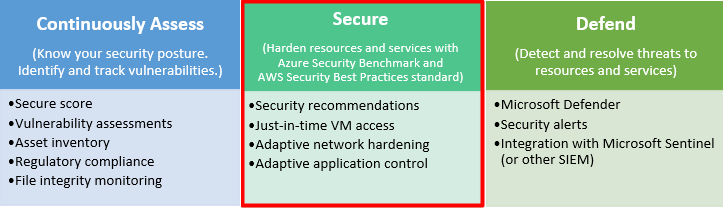
| Secure – Harden all connected resources and services. | Security recommendations – Customized and prioritized hardening tasks to improve your posture. You implement a recommendation by following the detailed remediation steps provided in the recommendation. For many recommendations, Defender for Cloud offers a “Fix” button for automated implementation! |
| Defend – Detect and resolve threats to those resources and services. | Security alerts – With the enhanced security features enabled, Defender for Cloud detects threats to your resources and workloads. These alerts appear in the Azure portal and Defender for Cloud can also send them by email to the relevant personnel in your organization. Alerts can also be streamed to SIEM, SOAR, or IT Service Management solutions as required. |
Posture management and workload protection
Microsoft Defender for Cloud’s features cover the two broad pillars of cloud security: cloud security posture management and cloud workload protection.
Cloud security posture management (CSPM)
In Defender for Cloud, the posture management features provide:
- Visibility – to help you understand your current security situation
- Hardening guidance – to help you efficiently and effectively improve your security
The central feature in Defender for Cloud that enables you to achieve those goals is secure score. Defender for Cloud continually assesses your resources, subscriptions, and organization for security issues. It then aggregates all the findings into a single score so that you can tell, at a glance, your current security situation: the higher the score, the lower the identified risk level.
When you open Defender for Cloud for the first time, it will meet the visibility and strengthening goals as follows:
- Generate a secure score for your subscriptions based on an assessment of your connected resources compared with the guidance in Azure Security Benchmark. Use the score to understand your security posture, and the compliance dashboard to review your compliance with the built-in benchmark. When you’ve enabled the enhanced security features, you can customize the standards used to assess your compliance, and add other regulations (such as NIST and Azure CIS) or organization-specific security requirements.
- Provide hardening recommendations based on any identified security misconfigurations and weaknesses. Use these security recommendations to strengthen the security posture of your organization’s Azure, hybrid, and multi-cloud resources.
Learn more about secure score.
Cloud workload protection (CWP)
Defender for Cloud offers security alerts that are powered by Microsoft Threat Intelligence. It also includes a range of advanced, intelligent, protections for your workloads. The workload protections are provided through Microsoft Defender plans specific to the types of resources in your subscriptions. For example, you can enable Microsoft Defender for Storage to get alerted about suspicious activities related to your Azure Storage accounts.
Azure, hybrid, and multi-cloud protections
Because Defender for Cloud is an Azure-native service, many Azure services are monitored and protected without needing any deployment.
When necessary, Defender for Cloud can automatically deploy a Log Analytics agent to gather security-related data. For Azure machines, deployment is handled directly. For hybrid and multi-cloud environments, Microsoft Defender plans are extended to non Azure machines with the help of Azure Arc. CSPM features are extended to multi-cloud machines without the need for any agents (see Defend resources running on other clouds).
Azure-native protections
Defender for Cloud helps you detect threats across:
- Azure PaaS services – Detect threats targeting Azure services including Azure App Service, Azure SQL, Azure Storage Account, and more data services. You can also perform anomaly detection on your Azure activity logs using the native integration with Microsoft Defender for Cloud Apps (formerly known as Microsoft Cloud App Security).
- Azure data services – Defender for Cloud includes capabilities that help you automatically classify your data in Azure SQL. You can also get assessments for potential vulnerabilities across Azure SQL and Storage services, and recommendations for how to mitigate them.
- Networks – Defender for Cloud helps you limit exposure to brute force attacks. By reducing access to virtual machine ports, using the just-in-time VM access, you can harden your network by preventing unnecessary access. You can set secure access policies on selected ports, for only authorized users, allowed source IP address ranges or IP addresses, and for a limited amount of time.
Defend your hybrid resources
In addition to defending your Azure environment, you can add Defender for Cloud capabilities to your hybrid cloud environment to protect your non-Azure servers. To help you focus on what matters the most, you’ll get customized threat intelligence and prioritized alerts according to your specific environment.
To extend protection to on-premises machines, deploy Azure Arc and enable Defender for Cloud’s enhanced security features. Learn more in Add non-Azure machines with Azure Arc.
Defend resources running on other clouds
Defender for Cloud can protect resources in other clouds (such as AWS and GCP).
For example, if you’ve connected an Amazon Web Services (AWS) account to an Azure subscription, you can enable any of these protections:
- Defender for Cloud’s CSPM features extend to your AWS resources. This agentless plan assesses your AWS resources according to AWS-specific security recommendations and these are included in your secure score. The resources will also be assessed for compliance with built-in standards specific to AWS (AWS CIS, AWS PCI DSS, and AWS Foundational Security Best Practices). Defender for Cloud’s asset inventory page is a multi-cloud enabled feature helping you manage your AWS resources alongside your Azure resources.
- Microsoft Defender for Kubernetes extends its container threat detection and advanced defenses to your Amazon EKS Linux clusters.
- Microsoft Defender for servers brings threat detection and advanced defenses to your Windows and Linux EC2 instances. This plan includes the integrated license for Microsoft Defender for Endpoint, security baselines and OS level assessments, vulnerability assessment scanning, adaptive application controls (AAC), file integrity monitoring (FIM), and more.
Learn more about connecting your AWS and GCP accounts to Microsoft Defender for Cloud.
Vulnerability assessment and management
Defender for Cloud includes vulnerability assessment solutions for your virtual machines, container registries, and SQL servers as part of the enhanced security features. Some of the scanners are powered by Qualys. But you don’t need a Qualys license, or even a Qualys account – everything’s handled seamlessly inside Defender for Cloud.
Microsoft Defender for servers includes automatic, native integration with Microsoft Defender for Endpoint. Learn more, Protect your endpoints with Defender for Cloud’s integrated EDR solution: Microsoft Defender for Endpoint. With this integration enabled, you’ll have access to the vulnerability findings from Microsoft threat and vulnerability management. Learn more in Investigate weaknesses with Microsoft Defender for Endpoint’s threat and vulnerability management.
Review the findings from these vulnerability scanners and respond to them all from within Defender for Cloud. This broad approach brings Defender for Cloud closer to being the single pane of glass for all of your cloud security efforts.
Learn more on the following pages:
- Defender for Cloud’s integrated Qualys scanner for Azure and hybrid machines
- Identify vulnerabilities in images in Azure container registries
Optimize and improve security by configuring recommended controls
It’s a security basic to know and make sure your workloads are secure, and it starts with having tailored security policies in place. Because policies in Defender for Cloud are built on top of Azure Policy controls, you’re getting the full range and flexibility of a world-class policy solution. In Defender for Cloud, you can set your policies to run on management groups, across subscriptions, and even for a whole tenant.
Defender for Cloud continuously discovers new resources that are being deployed across your workloads and assesses whether they are configured according to security best practices. If not, they’re flagged and you get a prioritized list of recommendations for what you need to fix. Recommendations help you reduce the attack surface across each of your resources.
The list of recommendations is enabled and supported by the Azure Security Benchmark. This Microsoft-authored, Azure-specific, benchmark provides a set of guidelines for security and compliance best practices based on common compliance frameworks. Learn more in Introduction to Azure Security Benchmark.
In this way, Defender for Cloud enables you not just to set security policies, but to apply secure configuration standards across your resources.

To help you understand how important each recommendation is to your overall security posture, Defender for Cloud groups the recommendations into security controls and adds a secure score value to each control. This is crucial in enabling you to prioritize your security work.

Defend against threats

Defender for Cloud provides:
- Security alerts – When Defender for Cloud detects a threat in any area of your environment, it generates a security alert. These alerts describe details of the affected resources, suggested remediation steps, and in some cases an option to trigger a logic app in response. Whether an alert is generated by Defender for Cloud, or received by Defender for Cloud from an integrated security product, you can export it. To export your alerts to Microsoft Sentinel, any third-party SIEM, or any other external tool, follow the instructions in Stream alerts to a SIEM, SOAR, or IT Service Management solution. Defender for Cloud’s threat protection includes fusion kill-chain analysis, which automatically correlates alerts in your environment based on cyber kill-chain analysis, to help you better understand the full story of an attack campaign, where it started and what kind of impact it had on your resources. Defender for Cloud’s supported kill chain intents are based on version 7 of the MITRE ATT&CK matrix.
- Advanced threat protection features for virtual machines, SQL databases, containers, web applications, your network, and more – Protections include securing the management ports of your VMs with just-in-time access, and adaptive application controls to create allowlists for what apps should and shouldn’t run on your machines.
The Defender plans page of Microsoft Defender for Cloud offers the following plans for comprehensive defenses for the compute, data, and service layers of your environment:
- Microsoft Defender for servers
- Microsoft Defender for Storage
- Microsoft Defender for SQL
- Microsoft Defender for Containers
- Microsoft Defender for App Service
- Microsoft Defender for Key Vault
- Microsoft Defender for Resource Manager
- Microsoft Defender for DNS
- Microsoft Defender for open-source relational databases
Use the advanced protection tiles in the workload protections dashboard to monitor and configure each of these protections.
Tip
Microsoft Defender for IoT is a separate product. You’ll find all the details in Introducing Microsoft Defender for IoT.
Next steps
- To get started with Defender for Cloud, you need a subscription to Microsoft Azure. If you don’t have a subscription, sign up for a free trial.
- Defender for Cloud’s free plan is enabled on all your current Azure subscriptions when you visit the Defender for Cloud pages in the Azure portal for the first time, or if enabled programmatically via the REST API. To take advantage of advanced security management and threat detection capabilities, you must enable the enhanced security features. These features are free for the first 30 days. Learn more about the pricing.
- If you’re ready to enable enhanced security features now, Quickstart: Enable enhanced security features walks you through the steps.
Investigate incidents with Microsoft Sentinel
Azure Sentinel is now called Microsoft Sentinel, and we’ll be updating these pages in the coming weeks. Learn more about recent Microsoft security enhancements.
Important
Noted features are currently in PREVIEW. The Azure Preview Supplemental Terms include additional legal terms that apply to Azure features that are in beta, preview, or otherwise not yet released into general availability.
This article helps you investigate incidents with Microsoft Sentinel. After you connected your data sources to Microsoft Sentinel, you want to be notified when something suspicious happens. To enable you to do this, Microsoft Sentinel lets you create advanced alert rules, that generate incidents that you can assign and investigate.
This article covers:
- Investigate incidents
- Use the investigation graph
- Respond to threats
An incident can include multiple alerts. It’s an aggregation of all the relevant evidence for a specific investigation. An incident is created based on analytics rules that you created in the Analytics page. The properties related to the alerts, such as severity and status, are set at the incident level. After you let Microsoft Sentinel know what kinds of threats you’re looking for and how to find them, you can monitor detected threats by investigating incidents.
Prerequisites
- You’ll only be able to investigate the incident if you used the entity mapping fields when you set up your analytics rule. The investigation graph requires that your original incident includes entities.
- If you have a guest user that needs to assign incidents, the user must be assigned the Directory Reader role in your Azure AD tenant. Regular (non-guest) users have this role assigned by default.
How to investigate incidents
- Select Incidents. The Incidents page lets you know how many incidents you have, how many are open, how many you’ve set to In progress, and how many are closed. For each incident, you can see the time it occurred, and the status of the incident. Look at the severity to decide which incidents to handle first.
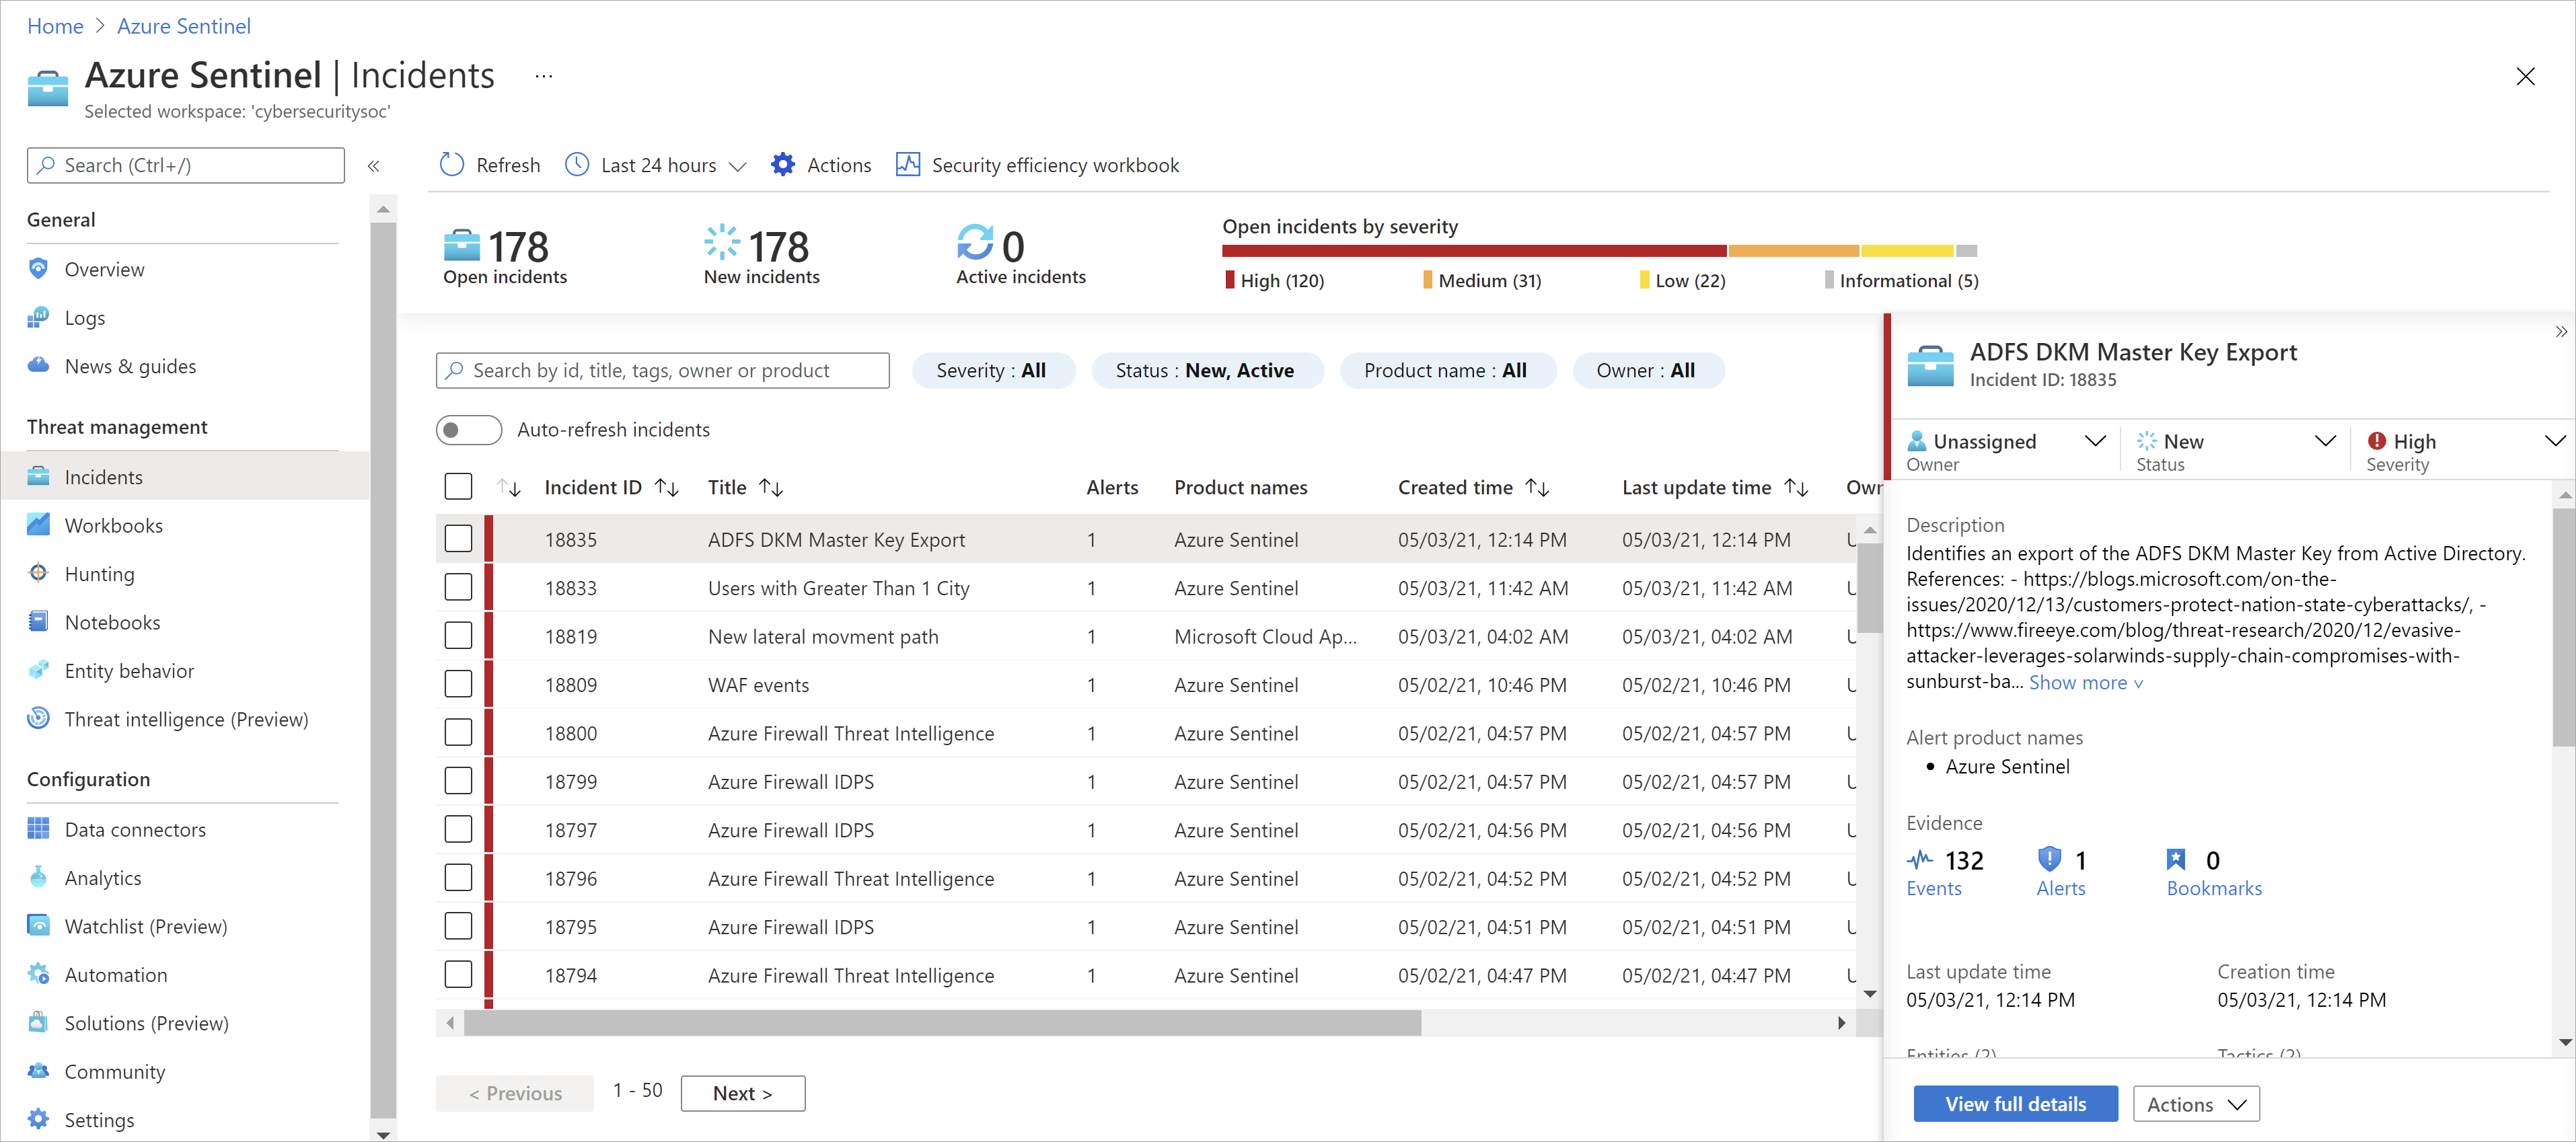
- You can filter the incidents as needed, for example by status or severity. For more information, see Search for incidents.
- To begin an investigation, select a specific incident. On the right, you can see detailed information for the incident including its severity, summary of the number of entities involved, the raw events that triggered this incident, the incident’s unique ID, and any mapped MITRE ATT&CK tactics or techniques.
- To view more details about the alerts and entities in the incident, select View full details in the incident page and review the relevant tabs that summarize the incident information.
 For example:
- In the Timeline tab, review the timeline of alerts and bookmarks in the incident, which can help you reconstruct the timeline of attacker activity.
- In the Alerts tab, review the alert itself. You can see all relevant information about the alert – the query that triggered the alert, the number of results returned per query, and the ability to run playbooks on the alerts. To drill down even further into the incident, select the number of Events. This opens the query that generated the results and the events that triggered the alert in Log Analytics.
- In the Entities tab, you can see all the entities that you mapped as part of the alert rule definition.
- If you’re actively investigating an incident, it’s a good idea to set the incident’s status to In progress until you close it.
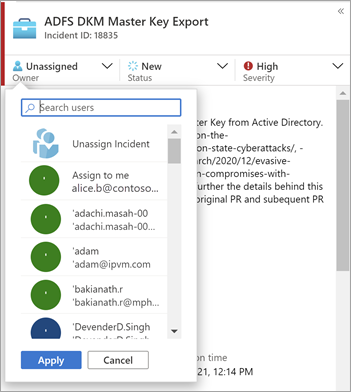
- Incidents can be assigned to a specific user. For each incident you can assign an owner, by setting the Incident owner field. All incidents start as unassigned. You can also add comments so that other analysts will be able to understand what you investigated and what your concerns are around the incident.
- Select Investigate to view the investigation map.
Use the investigation graph to deep dive
The investigation graph enables analysts to ask the right questions for each investigation. The investigation graph helps you understand the scope, and identify the root cause, of a potential security threat by correlating relevant data with any involved entity. You can dive deeper and investigate any entity presented in the graph by selecting it and choosing between different expansion options.
The investigation graph provides you with:
- Visual context from raw data: The live, visual graph displays entity relationships extracted automatically from the raw data. This enables you to easily see connections across different data sources.
- Full investigation scope discovery: Expand your investigation scope using built-in exploration queries to surface the full scope of a breach.
- Built-in investigation steps: Use predefined exploration options to make sure you are asking the right questions in the face of a threat.
To use the investigation graph:
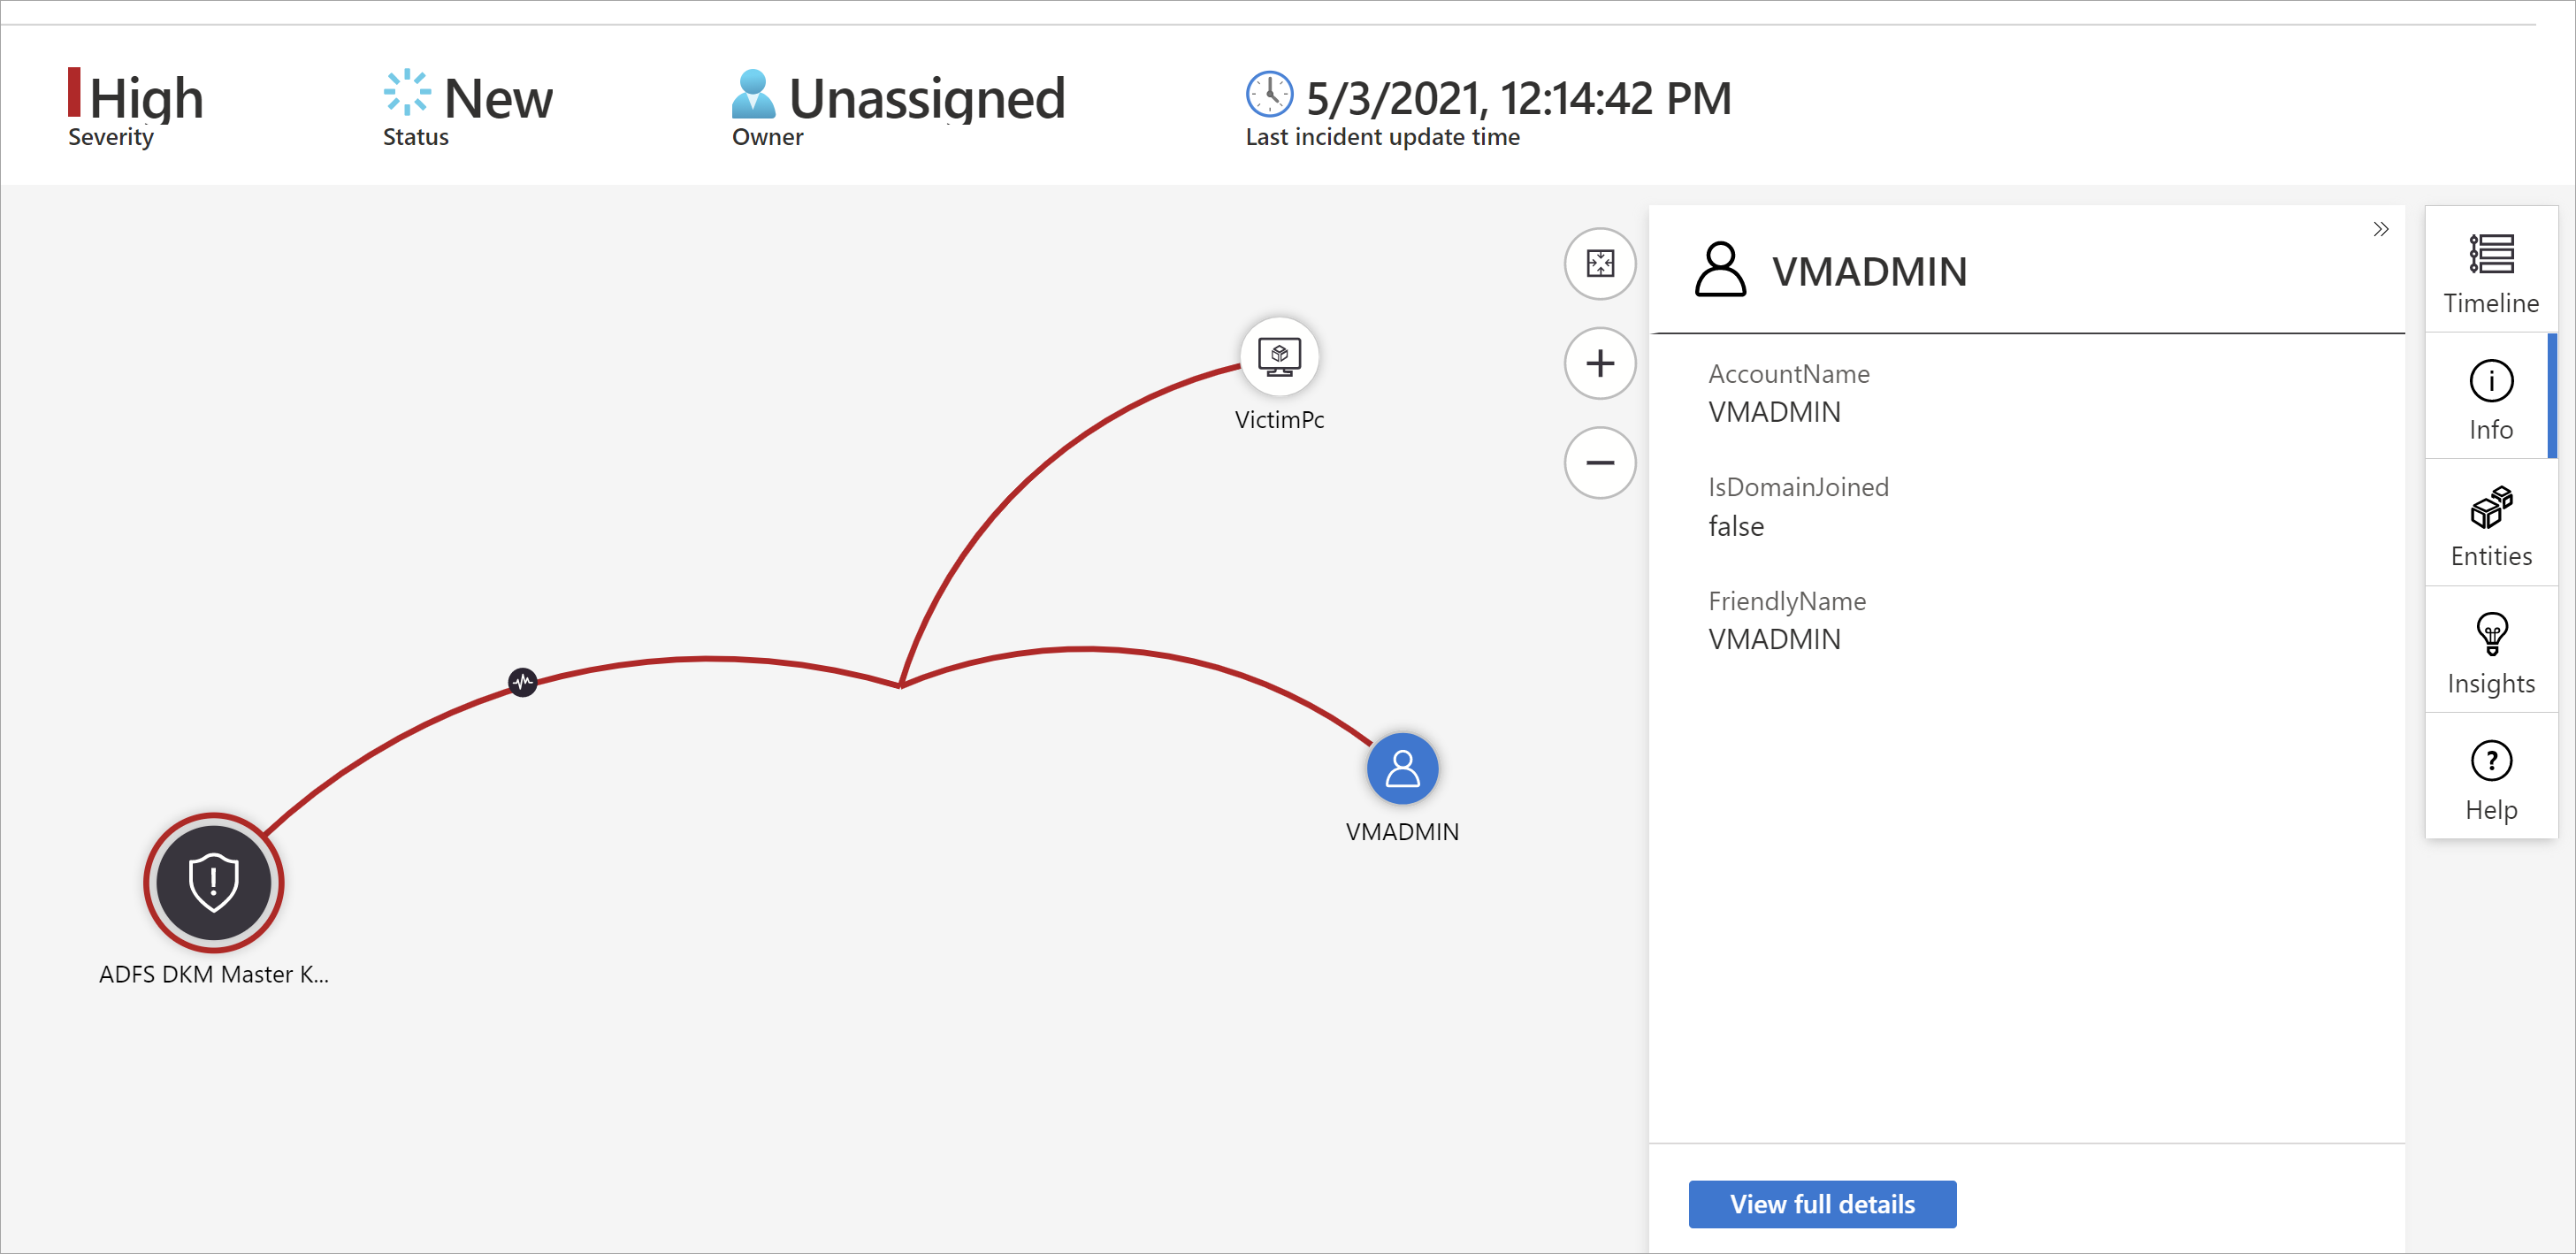
- Select an incident, then select Investigate. This takes you to the investigation graph. The graph provides an illustrative map of the entities directly connected to the alert and each resource connected further. Important
- You’ll only be able to investigate the incident if you used the entity mapping fields when you set up your analytics rule. The investigation graph requires that your original incident includes entities.
- Microsoft Sentinel currently supports investigation of incidents up to 30 days old.
- Select an entity to open the Entities pane so you can review information on that entity.
- Expand your investigation by hovering over each entity to reveal a list of questions that was designed by our security experts and analysts per entity type to deepen your investigation. We call these options exploration queries.
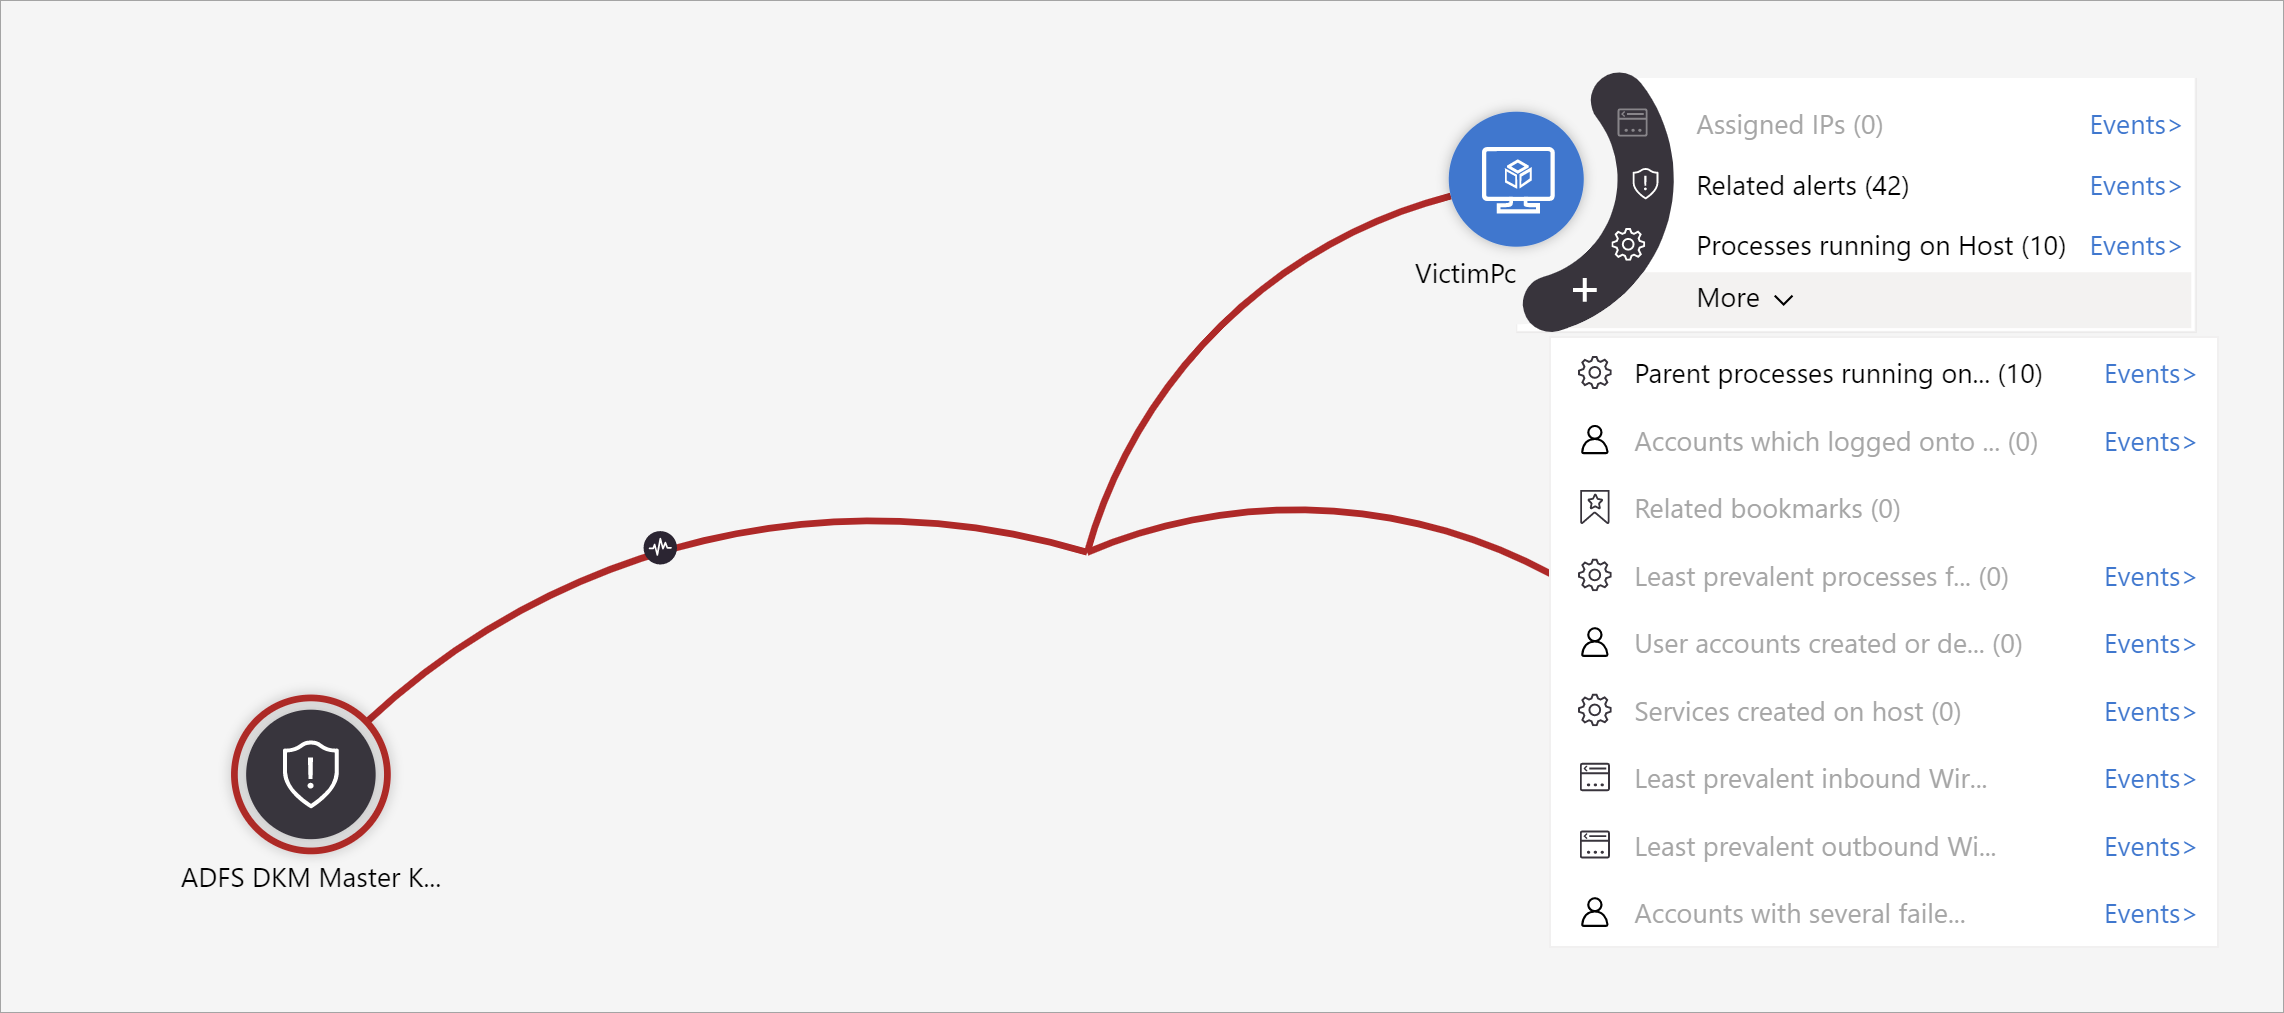 For example, on a computer you can request related alerts. If you select an exploration query, the resulting entitles are added back to the graph. In this example, selecting Related alerts returned the following alerts into the graph:
- For each exploration query, you can select the option to open the raw event results and the query used in Log Analytics, by selecting Events>.
- In order to understand the incident, the graph gives you a parallel timeline.

- Hover over the timeline to see which things on the graph occurred at what point in time.

Closing an incident
Once you have resolved a particular incident (for example, when your investigation has reached its conclusion), you should set the incident’s status to Closed. When you do so, you will be asked to classify the incident by specifying the reason you are closing it. This step is mandatory. Click Select classification and choose one of the following from the drop-down list:
- True Positive – suspicious activity
- Benign Positive – suspicious but expected
- False Positive – incorrect alert logic
- False Positive – incorrect data
- Undetermined

For more information about false positives and benign positives, see Handle false positives in Microsoft Sentinel.
After choosing the appropriate classification, add some descriptive text in the Comment field. This will be useful in the event you need to refer back to this incident. Click Apply when you’re done, and the incident will be closed.

Search for incidents
To find a specific incident quickly, enter a search string in the search box above the incidents grid and press Enter to modify the list of incidents shown accordingly. If your incident isn’t included in the results, you may want to narrow your search by using Advanced search options.
To modify the search parameters, select the Search button and then select the parameters where you want to run your search.
For example:
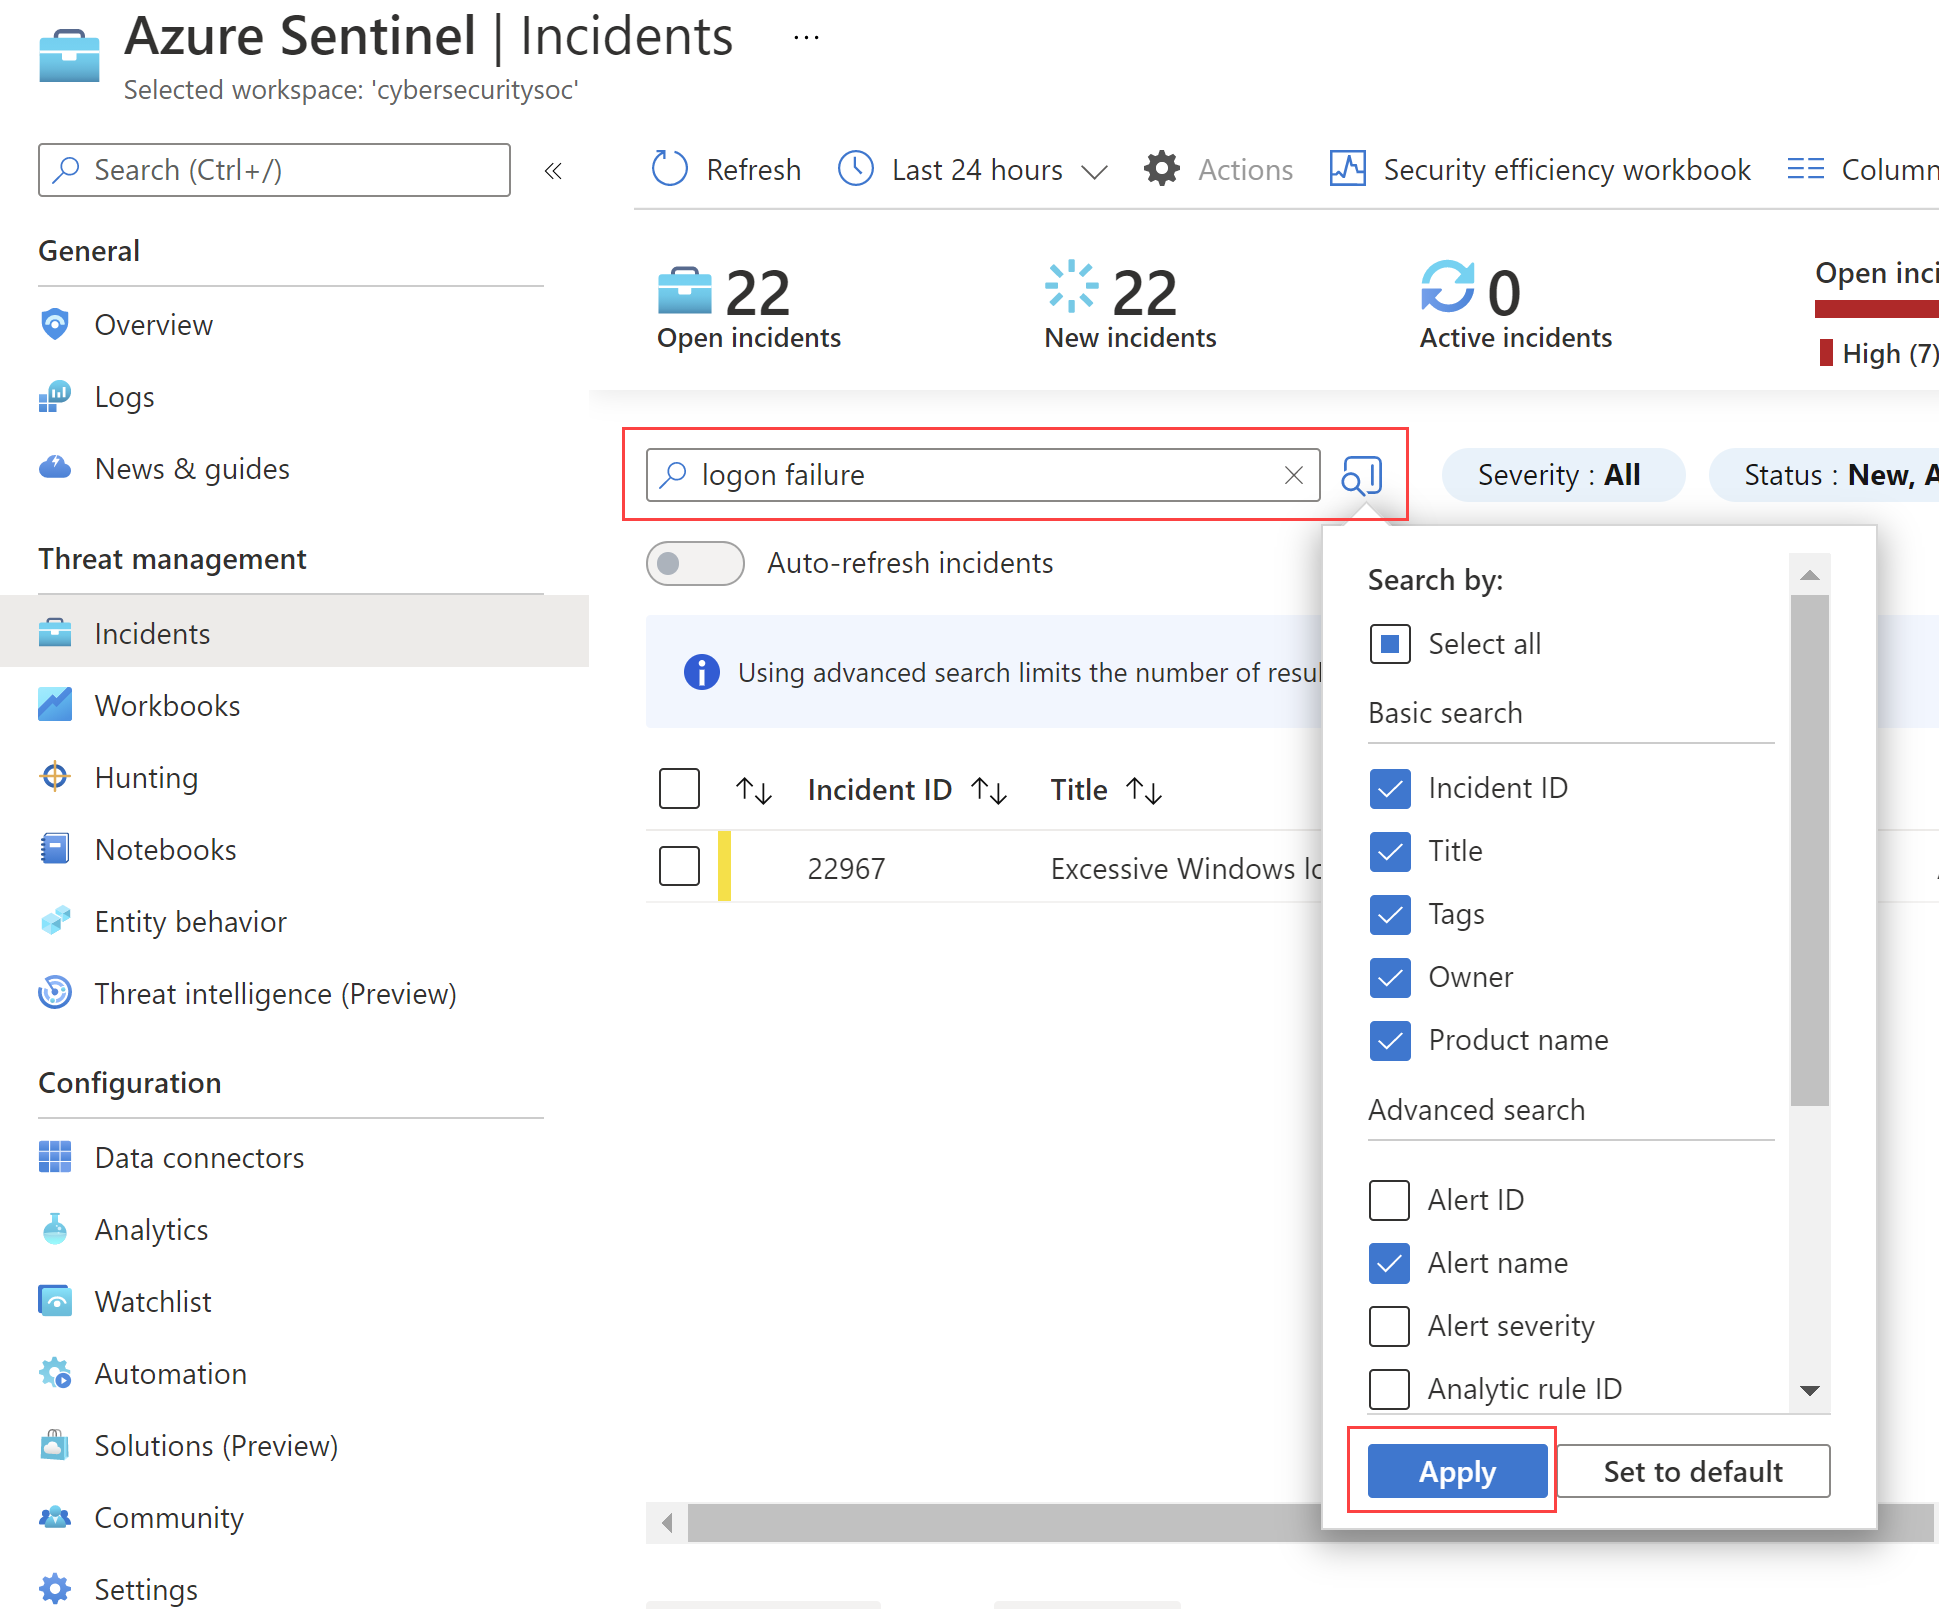
By default, incident searches run across the Incident ID, Title, Tags, Owner, and Product name values only. In the search pane, scroll down the list to select one or more other parameters to search, and select Apply to update the search parameters. Select Set to default reset the selected parameters to the default option.
