Unity Tutorial – 3D Spinning Cube in 10 minutes
- Introduction
- Download and install
- Create a Unity project
- Create a cube
- Add a script
- Edit a script
- Build the cube
- Next steps
Download and install
Download and install Unity Hub:
Unity Hub allows you to manage different Unity installations. After downloading it, follow the instructions on screen to set up Unity Hub on your machine.
Activate a new license
- After the installation has finished, open Unity Hub if it’s not already running.
- If you’re not on the License page automatically, select the Gear icon on the top-right menu and select License Management on the left menu.


- On the top-right menu, select the User icon > Sign in.
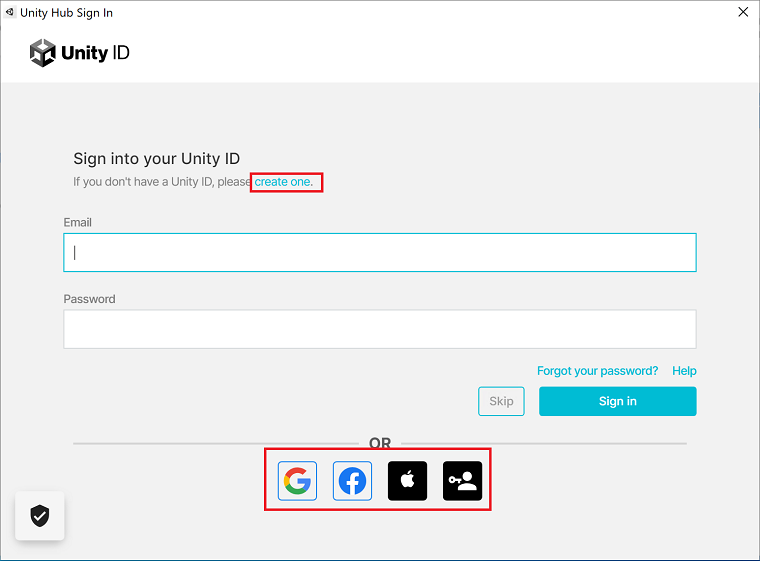
 The Unity Hub Sign In dialog appears.
 - Sign in to your Unity account or click on the create one link to create a new account. You can also use one of the social login options.
- Once you successfully logged in, select the Activate New License button on the top right.
 The New License Activation dialog appears.
 - Choose Unity Personal and then I don’t use Unity in a professional capacity options. Press Done. Make sure you edit the license later if you start using Unity professionally to be compliant with the license agreement.

- Once you see a license applied to your account, select the back arrow to leave the preferences menu.

Install the latest long-term support (LTS) version of Unity
- On Unity Hub, select Installs on the left menu.

- Select the Add button to add a new Unity installation.
 The Add Unity Version dialog appears.
 - Choose the latest LTS version and select the Next button.
 The LTS versions are the most stable, and they get updates and support for a longer time.
- During the installation of Unity from the Unity Hub, choose to install the latest version of Visual Studio. If you already have a different edition of Visual Studio 2019 installed, you can uncheck this option. Select the Next button.

- If you’re installing Visual Studio with the Unity installation, the End User License Agreement appears. Read the terms and conditions and select I have read and agree with the above terms and conditions. Select the Done button. The installation begins. Installation can take some time depending on your machine.
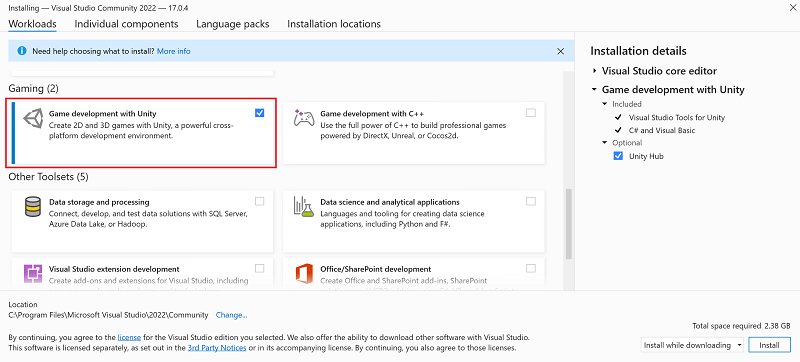
Already have Visual Studio installed?
If you already had Visual Studio 2019 installed when setting up Unity Hub, you need the Unity workload installed.
To add the Unity workload to Visual Studio:
- Press the Windows key, type Visual Studio Installer, and press Enter.
- If prompted, allow the installer to update itself.
- Find your Visual Studio 2019 installation and select More > Modify.
- Select Game Development with Unity and then select the Modify button.